In continuing my series on how to draw various fish in the ocean, I decided to draw a shark and show you how I went about it.

Steps to Drawing a Shark in Procreate
- Draw the top of the water which separates the sky from the water’s surface.
- Draw the next line showing the underwater area.
- Make the deeper water deeper blue.
- Draw the shark outline and get the general shape close.
- Add mouth, gills, fins, and the lateral line separating the top and bottom.
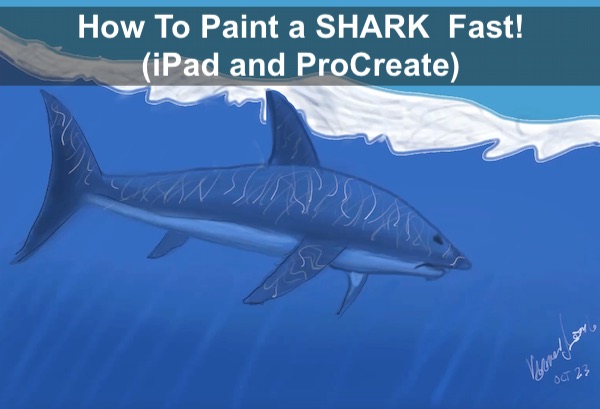
- Start shading the grey of the upper part of the shark. Fins not getting light are extra dark.
- Shade the lighter white area of the belly – what we can see from the side.
- Add the beams of light cutting through the water.
- Add caustic lines of light on the top areas of the shark. These are rays of sharp light that are bright and make an odd pattern on the shark and anything in the water when it’s shallow.
- Darken the middle of the shark and the fins. Make sure the shark looks roundish.
- Treat the surface of the water to make it look realistic (tough!)
- Add some bubbles toward the surface.
- Sign your name, you’ve just drawn a shark underwater in a semi-realistic painting style using ProCreate and an iPad!
We start out by drawing a line separating the sky and the surface of the ocean and under the water. The lower line can be more wave-like. The top line is further from the viewer and can be looser curves and straighter. Add a blue sky fill to the top section.
Make a new layer and fill in the bottom part of the sea with a blue like the ocean depths.
Make a new layer. Next, we draw the outline of the shark. It need not be perfect, we’re sketching first and we’ll make it better in a short while. Draw the mouth and eye, gills, and fill in the shark fins. Try to get the fin positions right on. I distorted the fin pretty drastically when I first attempted this shark. I fixed it in this second try you can see in the video above.
This shark is drawn without using basic geometic shapes as a base to help you understand the relationship between them and the parts of the shark like head, mouth, fins, and lateral line separating the light and dark surfaces of the shark.
See how you do with this video, or go to the next one below – It’s MUCH EASIER, and you’ll see why using geometric shapes helps a lot as you formulate your drawing. Go here if you want to see the original video.
Before you do, here are some tips to help you draw sharks now and in the future.
8 Tips for Drawing Sharks on the iPad and with Procreate
Alright, let me help you get going with some tips that’ll make your sharks come alive on the canvas.
- Start with Basic Shapes – Don’t dive straight into details; start with simple geometric shapes. Use circles for the head, elongated triangles for fins, and rectangles for the body. This gives you a skeleton to work with and helps to keep proportions in check.
- Layer Up – Use separate layers for each part of the shark: fins, body, teeth, etc. This way, you can edit one section without messing up another. It’s a lifesaver, especially when you’re working with complex textures or want to experiment with colors. I don’t understand layers enough yet, I’m really at the basic learning stages. I’ll start with learning about layers, maybe today as I realize they are super helpful in drawing sharks and anything.
- Use Reference Images – You might think you know what a shark looks like, but trust me, reference images can give you insights you didn’t even think about. You’ll catch nuances in the fins, the eyes, or even the gills that you might’ve otherwise missed.
- Master Your Brushes – Procreate comes with a variety of brushes, and you can also download custom ones. For the shark skin texture, you might want to use a grainy brush for that rough, sandpaper-like feel. And for softer parts like the underbelly, a smoother brush works wonders.
- Shading Is Key – Sharks aren’t just one flat color; they’ve got a lot going on in terms of shading. Use a softer, transparent (less opacity %) brush to add dimension. Pay attention to how light interacts with the shark’s body, creating highlights and shadows. This will make your shark look more 3D and lifelike.
- Don’t Forget the Teeth – Those chompers are iconic, right? Use a fine brush to draw individual teeth. They aren’t all uniform, so make sure to vary their shapes and sizes a bit. And hey, throw in some shading to make them look menacing if they’re large enough for it!
- Action Lines for Movement – If you want your shark to look like it’s swimming or jumping out of the water, use action lines. These are simple lines that guide the viewer’s eye and suggest motion. Procreate has some cool brushes that can make these lines look like splashes or waves.
- Fine-Tuning with Adjustment Layers – Once you’re done with the basic drawing and coloring, use adjustment layers to fine-tune your artwork. You can adjust the hue, saturation, and brightness, or even add some filters for special effects. It’s like the cherry on top. I typically use the Photos App on my MacBook Air to adjust the entire color profile.
More Tips for Drawing Fish >
Drawing a Shark the Easy Way — Method 2
I saw a video of drawing a Great White Shark. I don’t the mouth is really this small on the big great whites, but I drew it as he had it. Here’s what I came up with.

Want to try to draw something a bit more difficult? Draw a REMORA fish here >